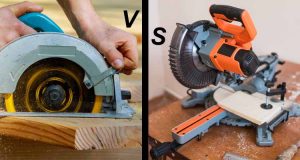
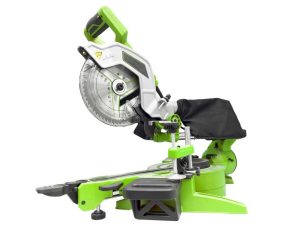
A miter saw is a versatile power tool commonly used in woodworking and construction. It allows users to make precise crosscuts and angled cuts, making it ideal for tasks such as framing, trim work, and crafting furniture. Whether you’re a professional carpenter or a DIY enthusiast, a saw is an essential tool in your arsenal.
However, even the best miter saws can drift out of alignment over time due to wear and tear or improper use. Calibration is crucial for achieving accurate cuts and ensuring safety during operation. A well-calibrated saw not only improves the quality of your work but also minimizes the risk of accidents caused by misaligned cuts.
How to calibrate a miter saw effectively, you’ll need a few essential tools: a square (either a carpenter’s square or framing square), calipers for precise measurements, and adjustment tools like an Allen wrench or screwdriver. With these tools on hand, you can ensure your saw delivers the accuracy and performance you need for your projects.
Understanding Miter Saw Components
Key Parts of a Miter Saw
Understanding these components and types of miter saws is essential for effective calibration and ensuring you choose the right tool for your cutting needs.
- Blade: The blade is the cutting element of the miter saw, available in various sizes and tooth configurations. Choosing the right blade for the material being cut is crucial for achieving clean cuts.
- Miter Gauge: This component allows you to set the angle of the cut. It can be adjusted to make precise miter cuts, typically ranging from 0 to 45 degrees or more, depending on the model.
- Fence: The fence is a straight edge that supports the material being cut. It should be aligned with the blade to ensure accurate cuts. A properly calibrated fence helps prevent errors and improves safety.
- Base: The base provides stability to the saw during operation. It often includes mounting holes for securing the saw to a workbench or table, ensuring it remains steady while cutting.
Types of Miter Saws
Miter saws come in several varieties, each designed for specific tasks:
- Compound Miter Saw: This type allows for both miter cuts and bevel cuts, enabling the user to tilt the blade at an angle. It’s ideal for cutting crown molding and other intricate angles.
- Sliding Miter Saw: This saw features a sliding mechanism that allows the blade to move forward and backward. This design increases the cutting capacity and is particularly useful for wider boards and larger materials.
- Single Bevel vs. Double Bevel:
- Single Bevel Miter Saw: This saw can tilt in one direction, allowing for bevel cuts on one side only. It’s often more affordable and simpler to use.
- Double Bevel Miter Saw: This more advanced option can tilt in both directions, making it easier to make bevel cuts without flipping the material. This feature is especially useful for complex projects and saves time.
Tools Needed for Calibration
To effectively calibrate your miter saw, you’ll need the following tools:
Measuring Tools
- Square (Carpenter’s Square or Framing Square): A square is essential for checking the alignment of the blade and ensuring that it is perfectly perpendicular to the base and fence. This tool helps achieve accurate cuts and is critical during calibration.
- Calipers: Calipers provide precise measurements and are useful for checking the distance between the blade and the fence. They help ensure that the saw is properly calibrated for consistent cuts.
Adjustment Tools
- Allen Wrench: If your miter saw has hex screws for adjustments, an Allen wrench is necessary to make those changes. It’s often needed for aligning the blade or making other adjustments.
- Screwdriver: A flathead or Phillips screwdriver may be required to tighten or loosen screws that hold the miter gauge, fence, or other components in place.
Safety Equipment
- Safety Glasses: Always wear safety glasses to protect your eyes from sawdust and debris while calibrating and using the tool.
- Hearing Protection: Tools can be loud, so wearing earplugs or earmuffs will help protect your hearing during operation.
How to Calibrate a Miter Saw Step-by-Step Process
Calibrating your miter saw involves several key steps to ensure accuracy and precision.
Calibrating the Blade Angle
- Adjusting the Blade: Begin by using your square to check if the blade is perpendicular to the base. Place the square against the blade and the base, ensuring there’s no gap.
- Making Adjustments: If the blade is not square, locate the adjustment screws or levers. Use an Allen wrench or screwdriver to adjust the angle until it’s perfectly aligned.
Setting the Miter Gauge
- Check for Accuracy: With the blade squared, check the miter gauge by setting it to 0 degrees. Use your square to verify that it aligns perfectly with the blade.
- Adjust if Necessary: If the miter gauge is not accurate, adjust it according to your saw’s instructions, usually involving loosening screws and repositioning the gauge.
Aligning the Fence
- Ensure Fence Alignment: With the blade and miter gauge calibrated, check the fence. Use your square to confirm that the fence is parallel to the blade.
- Making Adjustments: If the fence is misaligned, loosen the screws holding it in place and adjust it until it’s square to the blade. Re-tighten the screws securely.
Testing the Calibration
- Make Test Cuts: Once all components are calibrated, make a few test cuts on scrap wood. Check the cuts for accuracy using your square.
- Measure for Accuracy: Use a measuring tool to verify that the dimensions of the cuts match your settings. If the cuts are off, revisit the calibration steps.
Troubleshooting Common Issues
Even with proper calibration, issues may arise. Here’s how to address them:
Misaligned Cuts
- Identifying Causes: Misaligned cuts can occur due to an uncalibrated blade, miter gauge, or fence. Check each component to ensure they are correctly aligned.
- Solutions: Revisit the calibration process for any misaligned components. If the issue persists, inspect for wear on the saw’s parts that may require replacement.
Blade Drift
- Understanding Blade Drift: Blade drift happens when the blade does not stay aligned during cuts, often resulting in angled cuts.
- Fixing Blade Drift: Adjust the alignment of the blade and the fence. Ensure that the blade is sharp and properly installed. If the problem continues, consider replacing the blade or checking the saw’s components for wear.
Maintaining Your Miter Saw
Regular maintenance is key to keeping your saw in top condition.
Regular Calibration Schedule
- Calibration Recommendations: It’s advisable to calibrate your tool every few months, or more frequently if you use it often. Always check calibration before starting new projects.
General Maintenance Tips
- Keep the Saw Clean: Regularly remove sawdust and debris from the saw, particularly around the blade and miter gauge.
- Sharp Blades: Keep the blades sharp and replace them as needed. Dull blades can lead to inaccurate cuts and increase the risk of kickback.
Conclusion
how to calibrate a miter saw properly is essential for achieving accurate cuts and ensuring safety during operation. Regularly checking and maintaining your saw not only improves performance but also extends its lifespan. We encourage you to make calibration and maintenance a routine part of your woodworking projects to enjoy the best results and a safer work environment.
