Mastering the setup of your router table is the key to unlocking precision, safety, and a polished, professional finish in every woodworking project.
No matter your experience level, a well-installed router table delivers reliable performance and helps your equipment stand the test of time.
In this guide, you’ll discover each crucial step, from how to set up a router table for flawless results.
Types of Router Tables: Choosing the Right Foundation
Before you roll up your sleeves and get started, take a moment to explore the different types of router tables. Each one brings its own unique setup needs and advantages to your workshop:
- Benchtop Router Tables: These compact units are designed to sit on a workbench. For proper setup, first place the table on a sturdy, level workbench, then ensure it is securely fastened to avoid movement during use, and confirm the surface is even to guarantee accurate cuts.
- Floor-standing Router Tables: These larger units come with their own stands. During setup, position the table on a flat surface, check that each leg is level and stable, and adjust the feet or use shims if needed to prevent rocking.
- Cabinet-style Router Tables: These premium options feature enclosed cabinets. For setup, assemble the cabinet according to instructions, connect and test dust collection system components for fit, and ensure the router is mounted securely within the cabinet.
Essential Components for Proper Router Table Setup
Understanding these key components is crucial for a successful router table configuration:
- The Tabletop: The flat surface where your workpiece rests. Must be perfectly level for accurate cuts.
- The Fence: Guides your workpiece and provides stability. Must be parallel to the miter slot.
- The Router Mount: Secures your router underneath the table. Must be stable and properly aligned.
- The Insert Plate: Allows for bit changes and router access. Must sit flush with the tabletop.
- Dust Collection System: Essential for a clean workspace and tool longevity.
Safety Precautions Before Setup
Before you start setting up your router table, make sure to follow these safety steps:
- Wear appropriate personal protective equipment, including safety glasses and hearing protection.
- Ensure your workspace is well-lit and free from clutter.
- Disconnect power sources during the setup process.
- Have all necessary tools and hardware ready before starting.
- Read the manufacturer’s instructions for both your router and router table.
Step-by-Step Guide: How to Set up a Router Table
Prepare Your Workspace
Choose a location for your router table that offers:
- Adequate space around the table for maneuvering workpieces.
- Stable, level flooring (especially important for floor-standing models).
- Easy access to power outlets.
- Proper lighting from multiple angles to reduce shadows.
- Space for dust collection equipment.
Clear the area of unnecessary tools and materials to create a safe, efficient workspace.
Assemble the Table Base
If your router table requires assembly:
- Follow the manufacturer’s instructions carefully
- Tighten all bolts and connections firmly, but avoid over-tightening
- Use a level to ensure the table base is perfectly flat and stable
- For benchtop models, confirm your workbench is sturdy and level
- For floor-standing models, adjust the legs as needed to eliminate any wobble
Install the Tabletop
- Place the tabletop onto the base according to the manufacturer’s instructions.
- Check that the tabletop sits flat and level in all directions using a quality level.
- Secure the tabletop to the base, ensuring it doesn’t flex or rock.
- Verify that the miter slot is clean and free of debris.
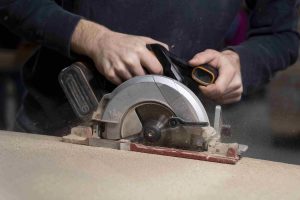
Mount the Router
- Select a router with appropriate power for your needs (1.5-3 HP is typical for most applications).
- If using a plate system, install the mounting plate first.
- Attach the router to the plate or directly to the table underside.
- Ensure the router base is level with the table surface.
- Check that all mounting screws are tight and the router is secure.
- Test the router’s height adjustment mechanism to ensure smooth operation.
Install and Align the Fence
- Attach the fence to the table according to the manufacturer’s instructions.
- Position the fence parallel to the miter slot using a reliable straight edge or dial indicator.
- Adjust the fence faces so they’re square to the table surface.
- Tighten all fence locking mechanisms securely.
- Test the fence adjustment mechanisms to ensure they move smoothly but lock firmly.
Set Up Dust Collection
- Connect your dust collection system to the table’s dust port.
- If your fence has dust collection, connect it as well.
- Ensure all connections are secure and airtight.
- Test the system to confirm adequate suction.
Install the Insert Plate and Ring
- Place the insert plate into the tabletop opening.
- Ensure it sits flush with the tabletop surface.
- Select the appropriate insert ring for your router bit (the smallest ring that still provides clearance).
- Install the ring securely.
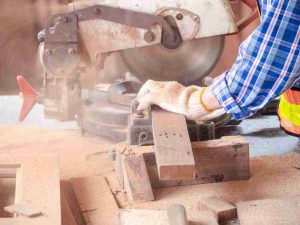
Install a Router Bit
- Disconnect power before changing bits.
- Choose an appropriate bit for your initial test (a straight bit is ideal for setup).
- Insert the bit shank fully into the collet, then pull it back about 1/8″ to prevent bottoming out.
- Tighten the collet securely using two wrenches.
- Double-check that the bit is properly secured.
Set Initial Bit Height
- Use a height gauge or measuring tool for precision.
- For initial setup, set the bit to extend just above the table surface.
- Lock the height adjustment mechanism.
- Verify the height measurement from multiple angles.
Calibrate the Fence to Bit Relationship
- Position the fence so it’s parallel to the bit’s cutting edge.
- For edge profiling, align the fence faces so they just “kiss” the bearing.
- For groove cutting, set the fence to expose only the cutting width you need.
- Lock the fence securely in place.
- Double-check all measurements and alignments.
Testing Your Router Table Setup
Before beginning actual projects, test your router table configuration:
- Power Test: Turn on the router and listen for any unusual vibrations or noises.
- Alignment Test: Make a test cut on scrap wood to check fence alignment and bit height.
- Safety Check: Verify that all safety features, including guards and emergency stops, function properly.
- Dust Collection Test: Run the router with dust collection to confirm effectiveness.
Make any necessary adjustments before proceeding with your projects.
Maintenance Tips for Optimal Performance
To keep your router table setup functioning perfectly:
- Regularly check and re-tighten all bolts and connections.
- Keep the tabletop clean and free of dust and resin buildup.
- Periodically verify that your tabletop remains flat and level.
- Check that your fence stays parallel to the miter slot.
- Clean router bits after use to remove resin and debris.
- Lubricate moving parts like fence adjustments as recommended by the manufacturer.
Conclusion
Learning how to set up a router table is the foundation of successful woodworking projects. By following this comprehensive guide, you’ll ensure your router table is configured for precision, safety, and optimal performance. Remember that periodic checks and adjustments are normal as your equipment experiences regular use.
Investing time in a thorough router table installation will pay dividends in the quality of your work and the longevity of your tools. With your router table properly set up, you’re ready to explore the countless possibilities this versatile woodworking tool offers.
Whether you’re creating decorative edges, crafting precision joinery, or shaping complex profiles, a well-configured router table will help you achieve professional results with confidence and consistency.