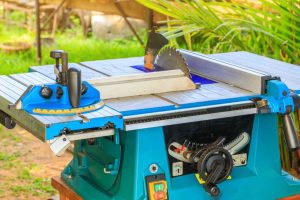
A table saw is one of the most powerful and versatile tools in woodworking, allowing for precise and efficient cuts across a wide range of projects. Whether you’re building furniture, cabinets, or intricate wood designs, understanding how to operate a table saw safely and effectively can make your work faster, more accurate, and enjoyable.
This section should help beginners understand the basic principles of table saw operation and highlight the advantages of mastering its use. Emphasize the importance of safety, precision, and efficiency, as well as the confidence that comes with knowing how to handle a table saw properly.
Essential Table Saw Safety Precautions
A table saw’s powerful motor and sharp, rotating blade are invaluable in woodworking, but also pose serious risks if misused. Ensuring safety should always be the top priority to prevent accidents and injuries.
Recommended Safety Gear
- Eye Protection: Safety goggles or glasses to protect against flying debris.
- Hearing Protection: Use earplugs or earmuffs to prevent long-term hearing damage from exposure to high noise levels.
- Dust Mask: For protection from fine sawdust particles that can harm respiratory health.
- Protective Gloves: Specifically, gloves that fit securely, as loose-fitting gloves can catch on the blade.
Ensuring Workspace Readiness
- Clearing Debris: Maintain a clean and organized workspace to prevent slips, falls, or materials accidentally contacting the blade.
- Checking Table Saw Stability: Ensure the table saw is on a stable surface and that any stands or bases are secure.
- Blade Guard: Confirm that the blade guard is intact and correctly positioned to provide a physical barrier between your hands and the blade.
Getting to Know Your Table Saw
Understanding the different parts and components of a table saw is essential for safe and accurate operation. Each part plays a critical role in the functionality, safety, and versatility of the tool, and knowing what each one does can help users make better decisions during projects. In this section, we’ll break down the essential parts of a table saw and introduce various types of saws that cater to different woodworking needs.
Table Saw Parts
- Blade: The primary cutting component, which can vary in diameter, tooth count, and material based on the types of cuts you’re making. Ensure it’s sharp and suited for the specific material you’re cutting.
- Fence: A guiding system that keeps wood aligned as it’s fed into the blade, allowing for straight, accurate cuts. The fence should be parallel to the blade for optimal results.
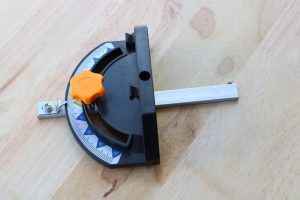
- Miter Gauge: A tool that slides into the table’s miter slots, helping guide the wood at a specific angle for crosscuts and angled cuts. Ideal for achieving precision in non-parallel cuts.
- Blade Guard: A protective covering that sits over the blade to shield the user from accidental contact and reduce the risk of kickback. Make sure it’s intact and used properly.
- Riving Knife or Splitter: Often positioned behind the blade, this component helps keep the wood from pinching the blade, reducing the likelihood of kickback.
- Throat Plate: A removable piece surrounding the blade, which helps control dust and can be replaced with custom inserts for zero-clearance cuts, minimizing splintering.
Different Types of Table Saws
- Benchtop Table Saw: A compact, portable saw designed for smaller projects. Typically lightweight and great for DIYers with limited space or those who need to transport their saw.
- Contractor Table Saw: A mid-range option with a larger table and higher power than benchtop models. Often chosen for on-site construction due to its durability and moderate portability.
- Cabinet Table Saw: A high-powered, heavy-duty saw with a stable base (cabinet) designed for extensive woodworking projects. Preferred by professionals and serious hobbyists for its precision and longevity.
- Hybrid Table Saw: A combination of contractor and cabinet saw features, providing a balance of power and portability. A good option for woodworkers who need precision without a full cabinet saw’s bulk.
Preparing the Table Saw for Use
Proper setup is essential for safe and accurate table saw operation. Taking time to adjust your table saw ensures each cut is precise and helps prevent accidents. This section guides readers through essential setup steps before starting any project.
Checking and Adjusting Blade Height and Alignment:
- Set the blade height so it extends slightly above the thickness of the wood being cut, improving control and reducing the chance of kickback.
- Use an alignment tool or square to ensure the blade is parallel to the miter slot, which is key for accurate cuts.
Calibrating the Fence and Miter Gauge for Accurate Cuts:
- Adjust the fence to be parallel to the blade, using a measuring tool to check the distance from the blade at both the front and back.
- Set the miter gauge angle accurately for angled cuts, ensuring a secure fit in the miter slot to avoid wobbling during cuts.
Testing Blade Sharpness and Stability:
- Check the blade’s sharpness to prevent rough cuts or burning, and replace it if it’s dull or damaged.
- Verify that the blade is securely tightened and free from wobble by rotating it manually before turning on the saw.
Mastering Basic Table Saw Techniques
A solid understanding of basic cutting techniques helps woodworkers get the most out of their table saw. In this section, readers learn how to perform the essential cuts needed for various projects, along with tips for accuracy and control.
Types of Cuts
- Rip Cuts: Cutting wood along the grain; typically done with the fence to keep the wood straight.
- Crosscuts: Cutting across the wood grain, often using the miter gauge to achieve straight or angled cuts.
- Beveled Cuts: Angled cuts are achieved by tilting the blade, allowing for custom designs.
- Dado Cuts: Grooves or notches made by stacking dado blades, ideal for joinery.
How to Position Wood Accurately for Each Type of Cut
- For rip cuts, adjust the fence to the desired width, and use push sticks or feather boards to guide the wood.
- For crosscuts, set the miter gauge to the desired angle and position the wood securely against the gauge.
Step-by-Step Guide on How To Operate A Table Saw
- Rip Cut: Align the wood with the fence, hold it firmly with both hands, and guide it through the blade while keeping pressure against the fence.
- Crosscut: Align wood with the miter gauge, apply even pressure, and carefully push it across the blade.
Tips for Avoiding Common Mistakes
Even experienced woodworkers can make mistakes when using a table saw. By understanding common errors, beginners and professionals alike can avoid costly and potentially dangerous mishaps. This section covers essential tips for a safer, smoother cutting experience.
How to Prevent Kickback and Other Safety Hazards:
- Keep the blade guard and riving knife in place to reduce kickback risks.
- Ensure the fence and blade are aligned to prevent the wood from binding and kicking back.
- Avoid cutting warped or twisted wood, which is more likely to cause kickback.
Maintaining Proper Body Position and Hand Placement:
- Stand to the side of the blade rather than directly behind it to stay out of kickback range.
- Use push sticks or push blocks to guide wood safely, keeping your hands clear of the blade.
Avoiding Burn Marks and Uneven Cuts:
- Ensure the blade is sharp to prevent burn marks, especially on hardwood.
- Maintain a consistent feed rate—pushing too slowly can cause burning, while pushing too quickly can result in uneven cuts.
Maintenance and Troubleshooting
Regular maintenance and troubleshooting ensure that a table saw remains safe and effective over time. This section details essential maintenance tasks and offers solutions for common issues, helping users prolong the life of their saw and maintain cut quality.
Cleaning and Lubricating the Table Saw:
- Regularly clean dust and debris from the table surface, blade, and motor housing.
- Lubricate the moving parts (such as the blade tilt and height mechanisms) to keep the saw operating smoothly.
Identifying and Addressing Common Problems:
- Blade Wobble: Check if the blade is properly seated and tightened. If wobbling persists, consider replacing the blade or arbor washer.
- Fence Misalignment: Use a measuring tool to ensure the fence is parallel to the blade; adjust as necessary to maintain cutting accuracy.
When to Replace the Blade or Other Components:
- Replace the blade when it becomes dull or if it shows visible signs of damage, like chipped or missing teeth.
- Inspect the fence, throat plate, and blade guard periodically for wear and replace them if they compromise accuracy or safety.
Advanced Techniques and Project Ideas
For those comfortable with basic cuts, experimenting with advanced techniques can open up new creative possibilities. This section introduces challenging cuts and project ideas to help woodworkers refine their skills and create impressive pieces.
Tips for Complex Cuts and Customizations:
- Joinery Cuts: Techniques like dadoes, rabbets, and grooves are ideal for crafting strong joints and customized pieces.
- Angled and Tapered Cuts: Perfect for creating unique designs, such as tapered table legs or angled picture frames.
- Box Joints and Finger Joints: Great for projects like drawers and boxes; these joints are both strong and decorative.
Project Ideas for Practicing Skills
- Picture Frames: Practice crosscuts and mitered edges.
- Cabinets: Perfect for mastering dado and rabbet cuts.
- Shelving and Bookcases: Utilize rip cuts and joinery to create customized storage solutions.
Conclusion
Recap the importance of safety, proper technique, and regular maintenance when using a table saw. Remind readers that mastering the basics is the key to becoming comfortable with the tool and achieving high-quality results.
Encourage readers to continue exploring advanced woodworking techniques and to practice their skills with different projects, emphasizing that confidence grows through experience and attention to detail.