Mortise bits are essential woodworking tools designed to create clean, precise mortises for joinery projects. These specialized drill bits, commonly combined with hollow chisel mortise or drill presses, help woodworkers achieve strong, professional-grade joints. However, many DIY enthusiasts and beginner woodworkers wonder: Can you use a mortise bit in a hand drill?
In this article, we will explore the feasibility of using a mortise bit in a hand drill, discuss the technical and safety challenges involved, and examine alternative methods for creating mortises. By the end, you’ll have a clear understanding of the best approach for your woodworking projects.
Understanding Mortise Bits
A mortise bit is a specialized drill bit used in woodworking to create mortises—rectangular or square holes that fit into corresponding tenons, forming strong, precise joints. Mortise bits are designed to remove large amounts of material quickly, making them ideal for joinery work.
There are several types of mortise bits, including:
- Hollow Chisel Mortise Bits: These consist of a hollow, chisel-like bit that cuts a precise, clean mortise while removing the wood chips from the hole. The chisel helps guide the bit, ensuring accuracy and clean edges.
- Spiral Mortise Bits: These bits have a spiral cutting edge and are known for their ability to cut smoothly, especially in harder woods. They remove material more efficiently than traditional straight bits.
Mortise bits are primarily used in mortising machines or drill presses, where the tool is fixed in place to ensure consistent depth, accuracy, and safety while cutting mortises.
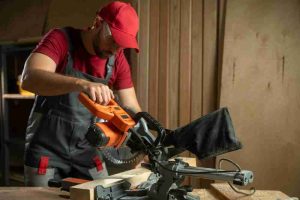
Can You Use a Mortise Bit in a Hand Drill?
Using a mortise bit in a hand drill is technically possible, but it is not recommended due to several limitations and challenges.
Technical Limitations
Mortise bits are specifically designed for fixed, high-power drill presses that provide stability and precision. Hand drills, on the other hand, lack this stability, making it difficult to achieve the accuracy needed for clean mortises.
Practical Challenges
One of the main issues when using a mortise bit in a hand drill is the lack of control. Hand drills can wobble, especially under the pressure of drilling large holes, leading to uneven mortises. Maintaining a perpendicular alignment is also difficult, which can result in angled cuts or inconsistent hole depths.
Safety Concerns
The risk of injury increases significantly when using a mortise bit in a hand drill. The bit’s large size and aggressive cutting action can cause slippage, especially if the drill bit catches unexpectedly. Additionally, a hand drill requires much more force to operate a mortise bit, which increases the likelihood of losing control and potentially causing harm.
For these reasons, it’s best to use a dedicated mortising machine or a drill press for mortising tasks to ensure both safety and precision.
Workarounds & Alternatives
Using a Mortising Jig
A mortising jig can help stabilize a hand drill by providing a fixed guide and supporting the workpiece. To create a makeshift mortising setup, attach a square, sturdy frame to the drill, allowing the bit to stay aligned as you drill. Ensure the jig holds the workpiece securely to prevent wobbling, and use the jig’s guides to maintain straight, perpendicular drilling.
Using a Chisel and Mallet
For a more traditional approach, use a chisel and mallet to create mortises. Drill a series of shallow holes with a smaller bit, then carefully remove the waste material using the chisel. This method requires patience but offers precision and control, ideal for smaller mortises or hand-tool enthusiasts.
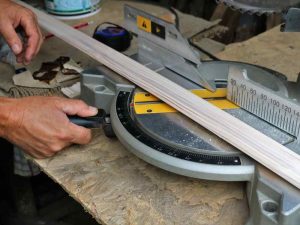
Drill Press as the Best Option
A drill press provides the stability and control necessary for precise mortising. The fixed nature of a drill press ensures accurate, perpendicular drilling, reducing the chances of slippage or misalignment. It’s the most effective option for using a mortise bit and ensuring clean, consistent cuts.
Router with a Straight Bit
A router with a straight bit is an excellent alternative for mortising tasks. It offers precise control, adjustable depths, and the ability to create wider mortises than a hand drill.
Forstner Bits & Cleanup with Chisels
Using a Forstner bit allows for clean, flat-bottomed holes. Drill out the majority of the waste material and then use a chisel to refine the edges and remove any remaining material, resulting in a clean, accurate mortise.
Best Practices for Safe & Effective Mortising
To achieve clean and precise mortises, it’s essential to follow these best practices:
- Use Sharp Tools: Dull bits or chisels can tear wood fibers, resulting in rough and uneven cuts. Regularly sharpen your mortise bits and chisels to ensure smooth and efficient cutting.
- Secure the Workpiece with Clamps: Movement during drilling or chiseling can lead to inaccurate cuts and potential safety hazards. Always clamp your workpiece firmly to a stable surface to maintain precision and control.
- Utilize Depth Guides: Whether using a drill press, router, or hand drill, setting a depth stop ensures consistency and prevents drilling too deep. This is especially crucial for mortise and tenon joints, where precise depth is required for a proper fit.
- Practice on Scrap Wood: Before working on your actual project, test your technique on scrap wood. This helps refine your approach, adjust your settings, and avoid costly mistakes on your final piece.
By following these best practices, you can enhance both the safety and quality of your mortising work, leading to stronger, more professional joinery results.
Conclusion
While a mortise bit can technically fit in a hand drill, it is not a practical or safe choice due to stability, precision, and safety concerns. For best results, use a drill press, router, or traditional chiseling techniques. These methods ensure cleaner, more accurate mortises, leading to stronger and more professional woodworking joints.